
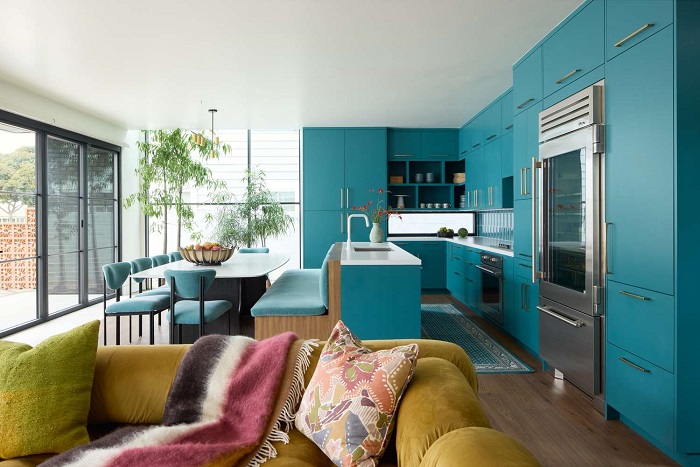
An outdated kitchen reveals its age in frustrating ways. Honey-oak cabinets with arched cathedral doors, stained laminate countertops with peeling seams, flickering fluorescent ceiling boxes, and cramped layouts make daily meal preparation feel like an uphill battle. Decades ago, kitchens were treated as closed-off utility rooms intended solely for food preparation. Today, the kitchen serves as the primary gathering hub of the home, demanding a thoughtful balance between durable craftsmanship, intuitive workflow, and timeless visual appeal.
Transforming a dated kitchen into a modern, hard-working space does not always require demolishing every wall or spending six figures on bespoke architectural millwork. A successful renovation begins with identifying where the space fails functionally, upgrading the surfaces that bear the brunt of daily use, and introducing smart design layers that stand the test of time.
Rethinking the Floor Plan and Work Zones
Before looking at cabinet door styles or quartz samples, take an objective look at how people move through the space. Many older kitchens were designed around the traditional work triangle, connecting the sink, refrigerator, and cooktop. While that geometry remains helpful, modern kitchen design focuses more effectively on dedicated work zones.
Divide your floor plan into distinct stations: food prep, cooking, cleanup, and food storage. Each zone requires dedicated surrounding counter space and immediate access to its respective tools. For instance, storing knives, cutting boards, and mixing bowls directly beside the primary prep surface prevents unnecessary steps across the room.
Pay close attention to circulation pathways. Ensure there is at least 36 to 42 inches of clearance between opposing counter runs or between an island and the perimeter cabinetry. In two-cook households, aim for 48 inches if the structural footprint allows. If an awkward peninsula cuts off the kitchen from the adjacent dining area and causes a bottleneck, removing it in favor of an open perimeter run or a freestanding prep island can immediately restore comfortable traffic flow.
Breathing New Life into Dated Cabinetry
Cabinetry accounts for the largest visual surface area and often the largest line item in a kitchen budget. Before committing to a complete tear-out, inspect the structural integrity of your existing cabinet boxes. If the frames are constructed from solid hardwood or sturdy three-quarter-inch plywood that remains plumb and level, modifying what you already have will free up substantial budget for higher-end fixtures and counters.
Professional Painting and Refinishing
Painting dark, golden-oak cabinets instantly shifts the visual weight of the room. However, standard wall paint will chip and peel within weeks on high-touch kitchen doors. A durable finish requires deep degreasing, mechanical sanding to break the existing polyurethane seal, a stain-blocking bonding primer, and two coats of polyurethane-modified enamel or waterborne alkyd paint. These industrial-grade coatings level out smoothly as they dry, leaving a hard, washable surface that mimics a factory finish. Soft, grounded hues like warm off-white, light greige, slate blue, or muted olive bring character while maintaining broad aesthetic longevity.
Retrofitting Interior Storage
A kitchen feels instantly more modern when it functions efficiently behind closed doors. Older cabinets with fixed, deep lower shelves force you onto your hands and knees to find cookware buried in dark corners. Swap those static lower shelves for full-extension roll-out trays and deep drawers built on soft-close undermount slides. Convert narrow base fillers into vertical pull-out spice racks, install heavy-duty divider bars for baking sheets, and fit dead blind corners with articulated swing-out shelving units to reclaim lost square footage.
Selecting Durable, Timeless Countertop Surfaces
Few surfaces transform a kitchen faster than the countertops. Replacing yellowed laminate or chipped 1980s ceramic tile with a continuous, clean slab creates a sleek foundation that ties the whole room together.
Engineered quartz remains an industry standard for good reason. Composed of roughly 90 percent crushed natural quartz bound with polymer resins, it is non-porous, highly resistant to staining from wine and acidic citrus, and never requires periodic sealing. Look for slabs with subtle, warm veining rather than dramatic, computer-generated marble patterns that can quickly date a remodel.
If you prefer natural stone, honed granite and quartzite offer distinct advantages:
-
Honed granite: Provides exceptional heat resistance with a soft, matte texture that hides minor dust and water spots far better than high-gloss polished varieties.
-
Natural quartzite: Offers the soft crystalline beauty of marble while delivering superior hardness that easily resists scratching from cutlery.
Carry your surface upgrade into the backsplash. Eliminating the dated four-inch countertop lip in favor of full-height tile running from the counter to the bottom of the upper cabinets creates vertical cohesion. While classic ceramic subway tile remains an economical staple, choosing handmade zellige-style tiles with subtle surface irregularities or arranging tiles in a vertical stack introduces understated organic texture without visual noise.
Designing a Multi-Layered Lighting Scheme
Nothing highlights the age of a kitchen like poor lighting. A single decorative pendant or a flush-mount frosted dome in the center of the ceiling casts harsh downward shadows, placing your hands in silhouette exactly where you are trying to chop vegetables.
A modern kitchen demands three independent layers of illumination:
-
Task lighting: Install continuous under-cabinet LED tape lights with a high Color Rendering Index (90+ CRI) tucked behind the front lip of upper cabinets. This casts an even, shadow-free plane of light directly across your primary food prep counters.
-
Ambient lighting: Position recessed ceiling cans directly over the counter edges rather than in the walkways. This placement prevents your body from blocking the beam spread while you work at the counter.
-
Accent and decorative lighting: Hang a pair of well-proportioned pendants over an island or peninsula, and add low-voltage puck lights inside glass-front display cabinets to create warmth and visual depth in the evening.
Set all fixtures on dimmers and standardize your bulbs to a warm-white color temperature of 2700K to 3000K. Cooler light above 4000K turns cabinetry clinical and makes fresh food look unappetizing.
Upgrading Fixtures and Hardware for Maximum Impact
Cabinet hardware, faucets, and sinks serve as the jewelry of the kitchen, providing tactile touchpoints that signal quality craftsmanship.
Trade shallow, double-bowl stainless steel drop-in sinks for an undermount workstation sink measuring at least 30 to 33 inches wide. Single-basin workstation sinks feature integrated interior ledges that hold sliding cutting boards, drying racks, and colanders, turning the sink basin into an extension of your usable prep space. Pair the sink with a high-arc, pull-down faucet equipped with a ceramic disc valve and an easy-clean magnetic docking spray head.
When selecting cabinet knobs and pulls, avoid flimsy hollow hardware. Substantial, solid-brass pulls provide a satisfying weight in the hand. Coordinating finishes—such as pairing brushed bronze hardware with a matte black faucet—adds curated personality without the rigid uniformity of matching every metal in the room.
By resolving layout bottlenecks, optimizing interior cabinet storage, upgrading to durable continuous countertops, and balancing layered lighting, you create an inviting culinary environment tailored to everyday life. A thoughtful renovation respects the structural footprint of the house while delivering the comfort, efficiency, and timeless style of a brand-new space.


